
Connect to Private Network on Windows 7: A Comprehensive Guide
Connecting to a private network on Windows 7 can be a crucial step for ensuring secure and efficient communication within your organization or home network. Whether you’re setting up a homegroup, joining a domain, or accessing a VPN, this guide will walk you through the process with detailed steps and explanations.
Understanding Private Networks

A private network is a network that is isolated from the public internet, providing a secure environment for data exchange. In Windows 7, you can connect to a private network using various methods, each tailored to different needs.
Setting Up a Homegroup
A homegroup is a simple way to share files, folders, printers, and libraries between computers on the same local network. Here’s how to set up a homegroup:
- Click on the Start button and type “homegroup” in the search box.
- Click on “Create a homegroup” to open the Homegroup wizard.
- Choose the types of files and folders you want to share, such as documents, pictures, music, and videos.
- Click “Next” and then “Create” to create your homegroup.
- On the other computers you want to join the homegroup, click “Join now” and enter the password you created.
Joining a Domain
Joining a domain allows you to access resources and services on a larger network, such as a corporate network. Here’s how to join a domain:
- Click on the Start button and type “control panel” in the search box.
- Click on “System and Security” and then “System.”
- Click on “Change settings” next to “Computer name, domain, and workgroup settings.”
- Click on “Change” under “Member of.”
- Select “Domain” and enter the domain name provided by your network administrator.
- Enter your username and password, and click “OK” to join the domain.
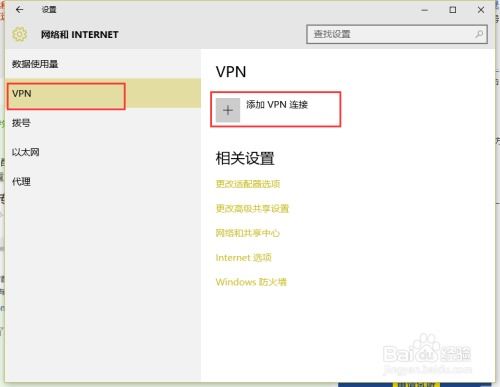
Connecting to a VPN
A VPN (Virtual Private Network) allows you to securely access a private network over the internet. Here’s how to connect to a VPN:
- Click on the Start button and type “control panel” in the search box.
- Click on “Network and Internet” and then “Network and Sharing Center.”
- Click on “Set up a new connection or network” and then “Connect to a workplace.”
- Click on “Use my Internet connection (VPN).”
- Enter the VPN server address, your username, and password.
- Click “Create” to establish the VPN connection.
Configuring Network Settings
After connecting to a private network, you may need to configure network settings to ensure optimal performance. Here are some common settings to consider:
| Setting | Description |
|---|---|
| IP Address | The unique identifier for your computer on the network. |
| Subnet Mask | Used to determine which part of an IP address identifies the network and which part identifies the host. |
| Default Gateway | The IP address of the router or gateway device that connects your local network to the internet. |
| DNS Server | Used to resolve domain names to IP addresses. |
Conclusion
Connecting to a private network on Windows 7 can be a straightforward process, provided you follow the correct steps and understand the different methods available. Whether you’re setting up a homegroup, joining a domain, or connecting to a VPN, this guide has provided you with the necessary information to get started.


