
Azure OMS Agent for Linux: A Comprehensive Guide
The Azure OMS (Operations Management Suite) Agent for Linux is a powerful tool designed to help you monitor and manage your Linux-based systems. Whether you’re running a small-scale deployment or a large-scale enterprise, this agent can provide you with valuable insights into the health and performance of your systems. In this article, we’ll delve into the various aspects of the Azure OMS Agent for Linux, including its installation, configuration, and usage.
Installation

Installing the Azure OMS Agent for Linux is a straightforward process. You can download the agent from the Azure portal or use the package manager of your Linux distribution. Here’s a step-by-step guide to installing the agent:
- Log in to the Azure portal and navigate to the “Operations Management Suite” section.
- Select the “Agents” tab and click on “Add agent” to start the installation process.
- Choose “Linux” as the platform and select the appropriate Linux distribution.
- Follow the on-screen instructions to download and install the agent on your Linux system.
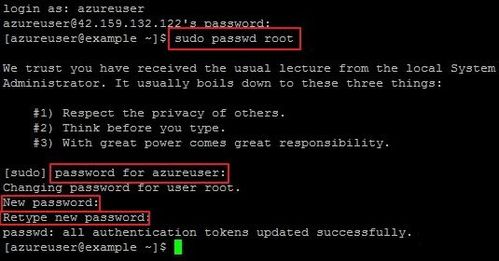
Alternatively, you can use the package manager of your Linux distribution to install the agent. For example, on a Debian-based distribution, you can use the following command:
sudo apt-get install azure-oms-agentConfiguration
Once the agent is installed, you’ll need to configure it to send data to your Azure OMS workspace. Here’s how you can do it:
- Open the agent configuration file, which is typically located at `/etc/omsagent/omsagent.json`.
- Locate the “Azure” section and update the “workspaceId” and “workspaceKey” fields with your Azure OMS workspace details.
- Save the configuration file and restart the agent to apply the changes.
Here’s an example of the Azure section in the configuration file:
"Azure": { "workspaceId": "your-workspace-id", "workspaceKey": "your-workspace-key"}Monitoring and Management
The Azure OMS Agent for Linux provides a wide range of monitoring and management capabilities. Here are some of the key features:
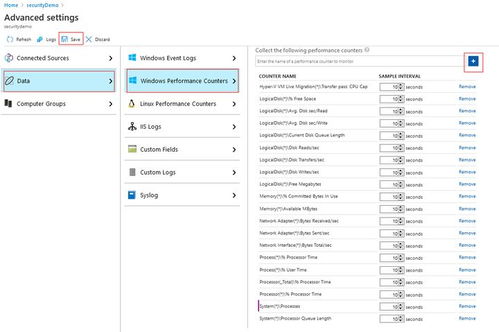
- Performance Monitoring: The agent collects performance data, such as CPU, memory, and disk usage, and sends it to Azure OMS for analysis.
- Log Analytics: The agent can forward logs from various sources, such as system logs, application logs, and custom logs, to Azure OMS for analysis.
- Alerts and Incidents: The agent can generate alerts and incidents based on predefined rules and thresholds.
- Automation: The agent can be used to automate tasks, such as deploying applications or configuring systems.
Here’s a table summarizing the key features of the Azure OMS Agent for Linux:
| Feature | Description |
|---|---|
| Performance Monitoring | Collects performance data, such as CPU, memory, and disk usage. |
| Log Analytics | Forwards logs from various sources to Azure OMS for analysis. |
| Alerts and Incidents | Generates alerts and incidents based on predefined rules and thresholds. |
| Automation | Automates tasks, such as deploying applications or configuring systems. |
Customization
The Azure OMS Agent for Linux is highly customizable, allowing you to tailor it to your specific needs. You can configure the agent to collect specific metrics, forward logs from specific sources, and set up custom alerts and incidents. Here’s how you can customize the agent:
- Open the agent configuration file, which is typically located at `/etc/omsagent/omsagent.json`.
- Modify the configuration settings to suit your requirements.
- Save the configuration file and restart the agent to apply the changes.
Related Posts

om parvat trek,Om Parvat Trek: A Journey Through the Himalayas
Om Parvat Trek: A Jo…

om nom stories,Om Nom Stories: A Detailed Multi-Dimensional Introduction
Om Nom Stories: A De…

bliss om yoga,Bliss Om Yoga: A Comprehensive Guide
Bliss Om Yoga: A Com…