
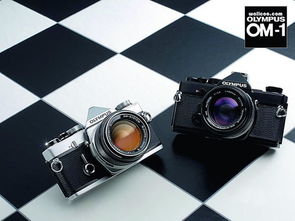
Olympus OM-1: How to Use This Versatile Camera
Are you new to the world of photography and looking to get the most out of your Olympus OM-1? Whether you’re a beginner or an experienced photographer, understanding the ins and outs of this versatile camera is crucial. In this detailed guide, we’ll walk you through the essential features, settings, and techniques to help you capture stunning images with your OM-1.
Understanding the OM-1’s Design

The Olympus OM-1 is a sleek, compact camera that boasts a modern design with a classic touch. Its ergonomic grip and intuitive layout make it comfortable to hold and easy to navigate. Here’s a quick rundown of its key components:
| Component | Description |
|---|---|
| Body | The main housing that protects the camera’s internal components. |
| Shutter Button | Used to take photos. Pressing it halfway locks focus and exposure, while pressing it fully triggers the shutter. |
| Mode Dial | Allows you to select different shooting modes, such as Auto, Program, Aperture Priority, Shutter Priority, and Manual. |
| Control Wheel | Used to adjust settings like aperture, shutter speed, and exposure compensation. |
| Menu Button | Accesses the camera’s menu system, where you can customize various settings. |
| Viewfinder | Used to compose and view your photos. The OM-1 offers both an electronic viewfinder and an optical viewfinder. |
| Display Screen | A 3-inch tilting touchscreen that allows you to view and review your photos, as well as navigate the camera’s menu system. |
Shooting Modes
The Olympus OM-1 offers a variety of shooting modes to suit different photography scenarios. Here’s a brief overview of each mode:
- Auto (iAuto): The camera automatically selects the best settings for the scene.
- Program (P): The camera sets the shutter speed and aperture, while you control the exposure compensation.
- Aperture Priority (A): You control the aperture, and the camera sets the shutter speed to achieve the desired depth of field.
- Shutter Priority (S): You control the shutter speed, and the camera sets the aperture to achieve the desired exposure.
- Manual (M): You control both the shutter speed and aperture, allowing for complete creative control.
- Portrait: Optimizes settings for portrait photography, such as a shallow depth of field and a slower shutter speed to capture motion blur.
- Landscape: Optimizes settings for landscape photography, such as a wider aperture and a slower shutter speed to capture motion blur.
- Macro: Optimizes settings for close-up photography, such as a shallow depth of field and a slower shutter speed to capture motion blur.
- Sports: Optimizes settings for fast-moving subjects, such as a fast shutter speed and a wider aperture to freeze motion.
- Night Scene: Optimizes settings for low-light photography, such as a slower shutter speed and a wider aperture to gather more light.
Customizing Your Settings
One of the strengths of the Olympus OM-1 is its extensive customization options. Here’s how to access and adjust some of the key settings:
- Menu System: Press the Menu button to access the camera’s menu system. From here, you can customize various settings, such as image quality, white balance, and autofocus.
- Custom Settings: The camera offers multiple custom settings slots, allowing you to save and quickly access your favorite settings.
- My Settings: You can create a


